Whether you’re managing a team or juggling multiple projects, time is of the essence. Automations can streamline repetitive tasks, reduce errors, and ensure your projects progress smoothly and consistently. This means less busy work and more time for strategic thinking and decision-making.
In this guide, we’ll dive deep into how ClickUp Automations work, their benefits, and how to set them up to transform your workflows.
What is ClickUp?
ClickUp is a comprehensive project management and productivity platform designed to help teams and individuals organize tasks, streamline projects, and improve collaboration.
Known for its versatility, ClickUp consolidates various productivity tools into one place, offering task management, time tracking, goal setting, document sharing, and communication features in a single workspace.
Users can customize ClickUp’s dashboards, workflows, and automations to fit their unique needs, making it adaptable to different industries and work styles, from small personal projects to large team initiatives.
What are ClickUp automations?
ClickUp Automations are a set of rules or triggers that automatically carry out tasks or actions in your workspace. Instead of manually performing routine actions — like updating task statuses, assigning team members, or sending notifications — automations handle them for you.
Automations in ClickUp follow a basic “trigger-action” format:
- Trigger: What starts the automation (e.g. a task status changes, a due date arrives).
- Action: The outcome or task that’s executed (e.g. send a notification, assign a task, update a custom field).
By setting up a variety of custom triggers and actions, you can tailor your automations to suit your workflow perfectly.
Why use automations in ClickUp?
1. Save time
Manually updating task statuses, moving cards between boards, and assigning team members can add up quickly. With automations, you eliminate these repetitive tasks, allowing you and your team to focus on more valuable work.
2. Minimize human error
When dealing with repetitive tasks, mistakes happen. Automations ensure that nothing falls through the cracks — due dates get set, notifications are sent, and tasks move through your workflow seamlessly and consistently.
3. Boost productivity
With less time spent on mundane tasks, teams can focus on creative or strategic initiatives. Automations also promote smoother workflows, which reduces bottlenecks and keeps projects moving forward.
4. Consistency across teams
For larger teams, ensuring consistency across projects can be challenging. Automations ensure that everyone follows the same workflow, reducing confusion and making sure tasks get done the same way every time.
5. Enhanced collaboration
Whether it’s notifying a team member when their input is needed or assigning tasks based on status changes, automations help streamline collaboration.
5 popular ClickUp automations
1. Recurring tasks
Create recurring tasks on a weekly, monthly, or custom schedule.
- Select a task: Choose an existing task you want to make recurring or create a new one.
- Select the recurrence option: In the task window, click into the Dates field and choose Set Recurring from the bottom left.
- Set the recurrence schedule: Select how often the task should recur (e.g. weekly, monthly, or custom interval) and select when the recurrence should be triggered:
- Choose recurrence options: Select Create new task if you wish to have a new task set up at the chosen interval. If you don’t want the task to recur forever, uncheck the box and specify how many times the recurrence should be repeated or an end date for it.
- Save the automation: Click the Save button. Now, this task will automatically appear at the scheduled interval, helping you stay on top of regular tasks without needing to recreate them.

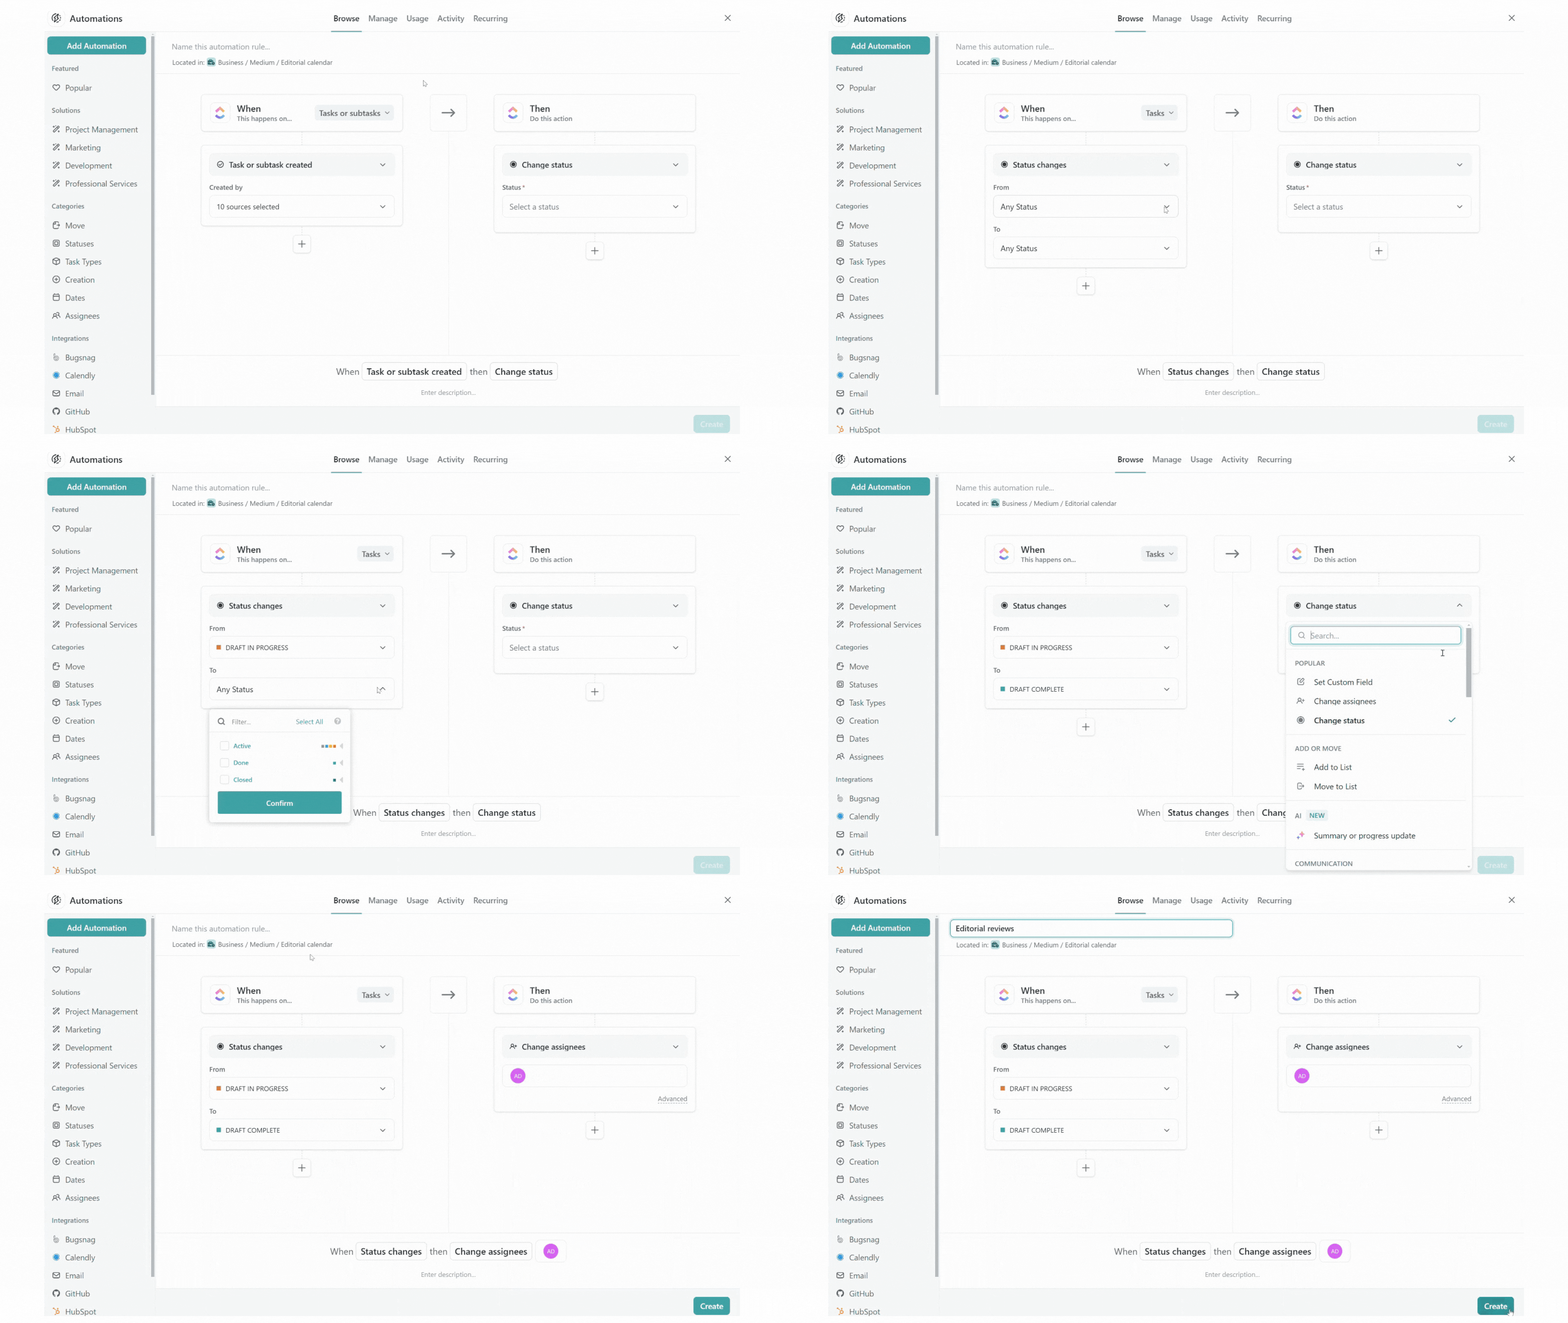
2. Task assignments based on status
Assign tasks to specific team members when they reach certain stages.
- Go to Automations: In any list, folder, or space, click on the Automations tab in the top right corner.
- Choose a trigger: Select When this happens on… Tasks and/or Subtasks, and Status changes, then choose the relevant statuses.
- Set the action: Choose Change assignees and select the team member to whom the task should be assigned.
- Finalise the automation: Name the automation at the top, then click the Create button. The task will now automatically be assigned when its status is updated.

3. Task prioritization
Prioritize tasks based on specific criteria to ensure important ones are flagged automatically.
- Go to Automations: In any list, folder, or space, click on the Automations tab in the top right corner.
- Choose a trigger: Select When this happens on… Tasks and/or Subtasks, and Due date arrives.
- Set the action: Choose Change Priority and select the Priority level.
- Finalise the automation: Name the automation at the top, then click the Create button. The task will now automatically be prioritized when its due date arrives.

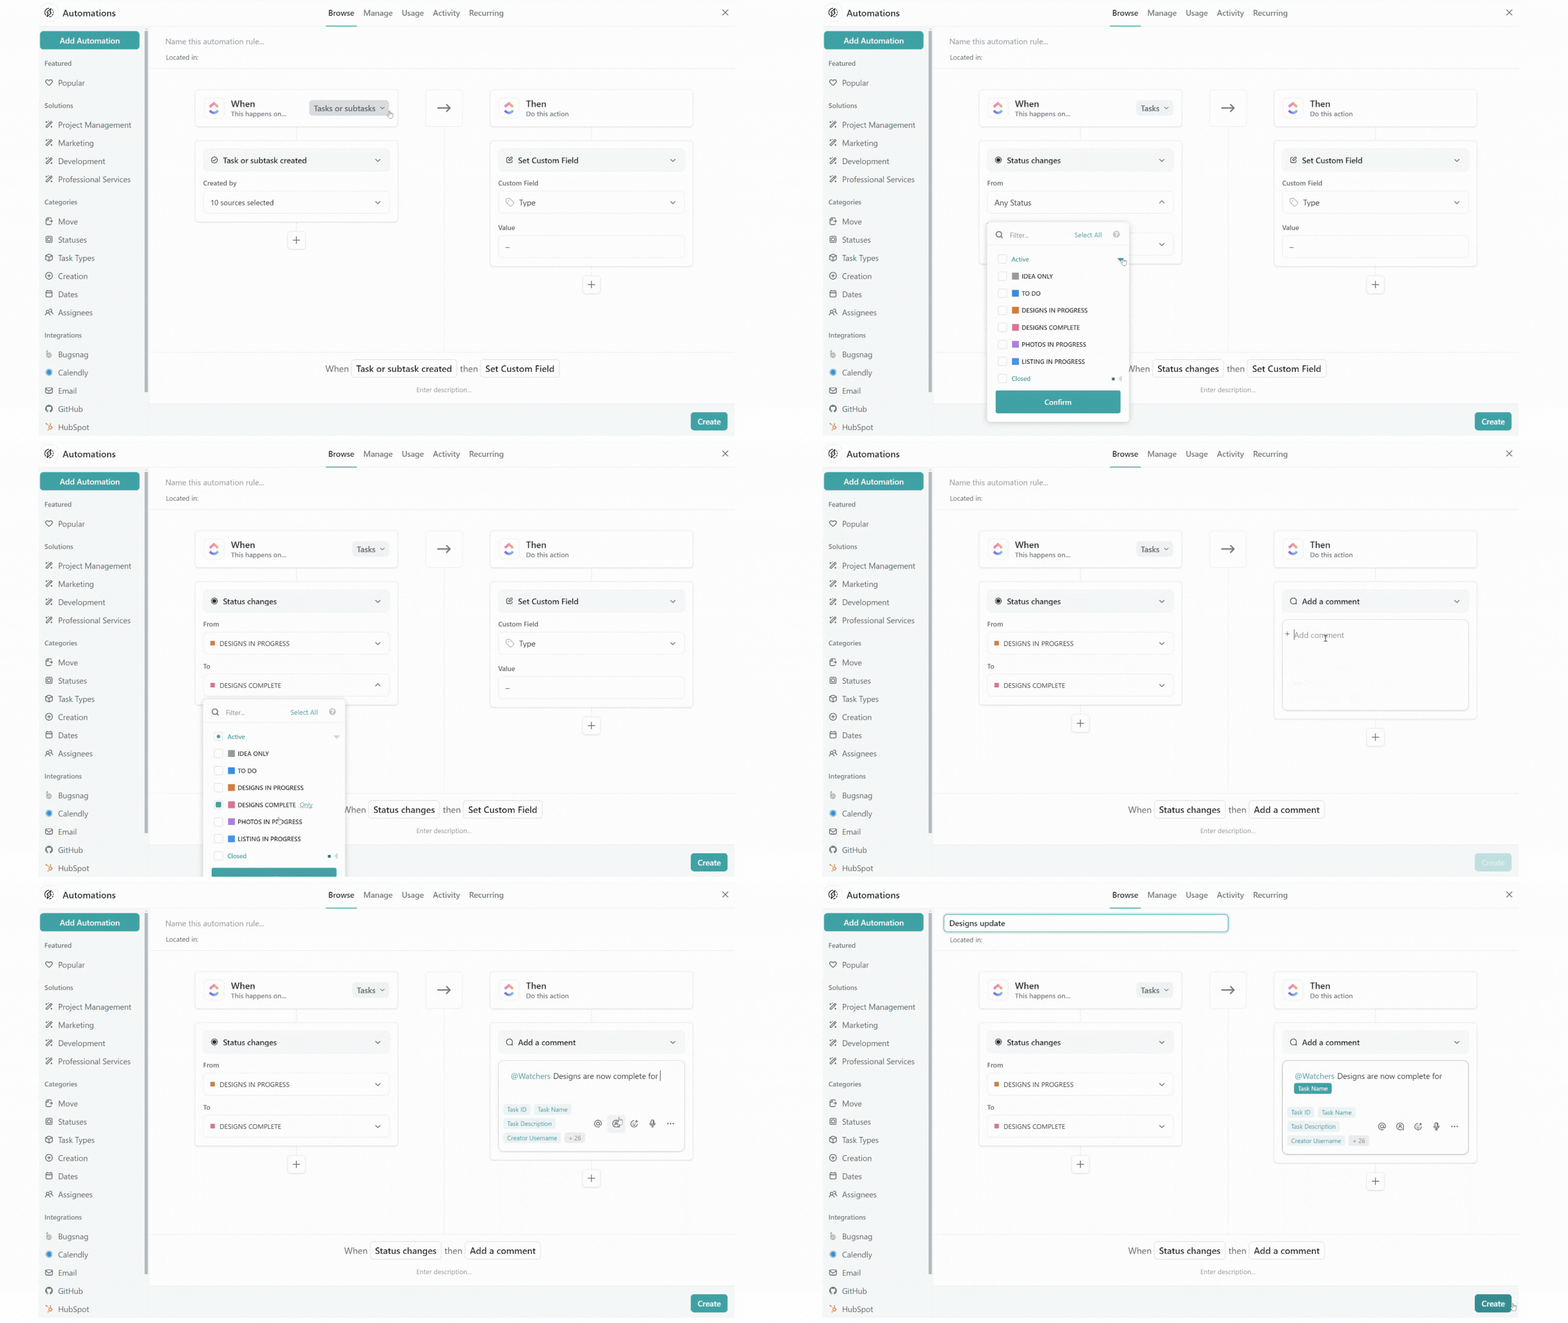
4. Team updates based on status
Automatically add comments or mentions when task statuses change.
- Go to Automations: In any list, folder, or space, click on the Automations tab in the top right corner.
- Choose a trigger: Select When this happens on… Tasks and/or Subtasks, and Status changes, then choose the relevant statuses.
- Set the action: Choose Add a comment and enter the update you wish to send, including any mentions and dynamic fields.
- Finalise the automation: Name the automation at the top, then click the Create button. Updates will now automatically be sent as comments when the task status is updated.

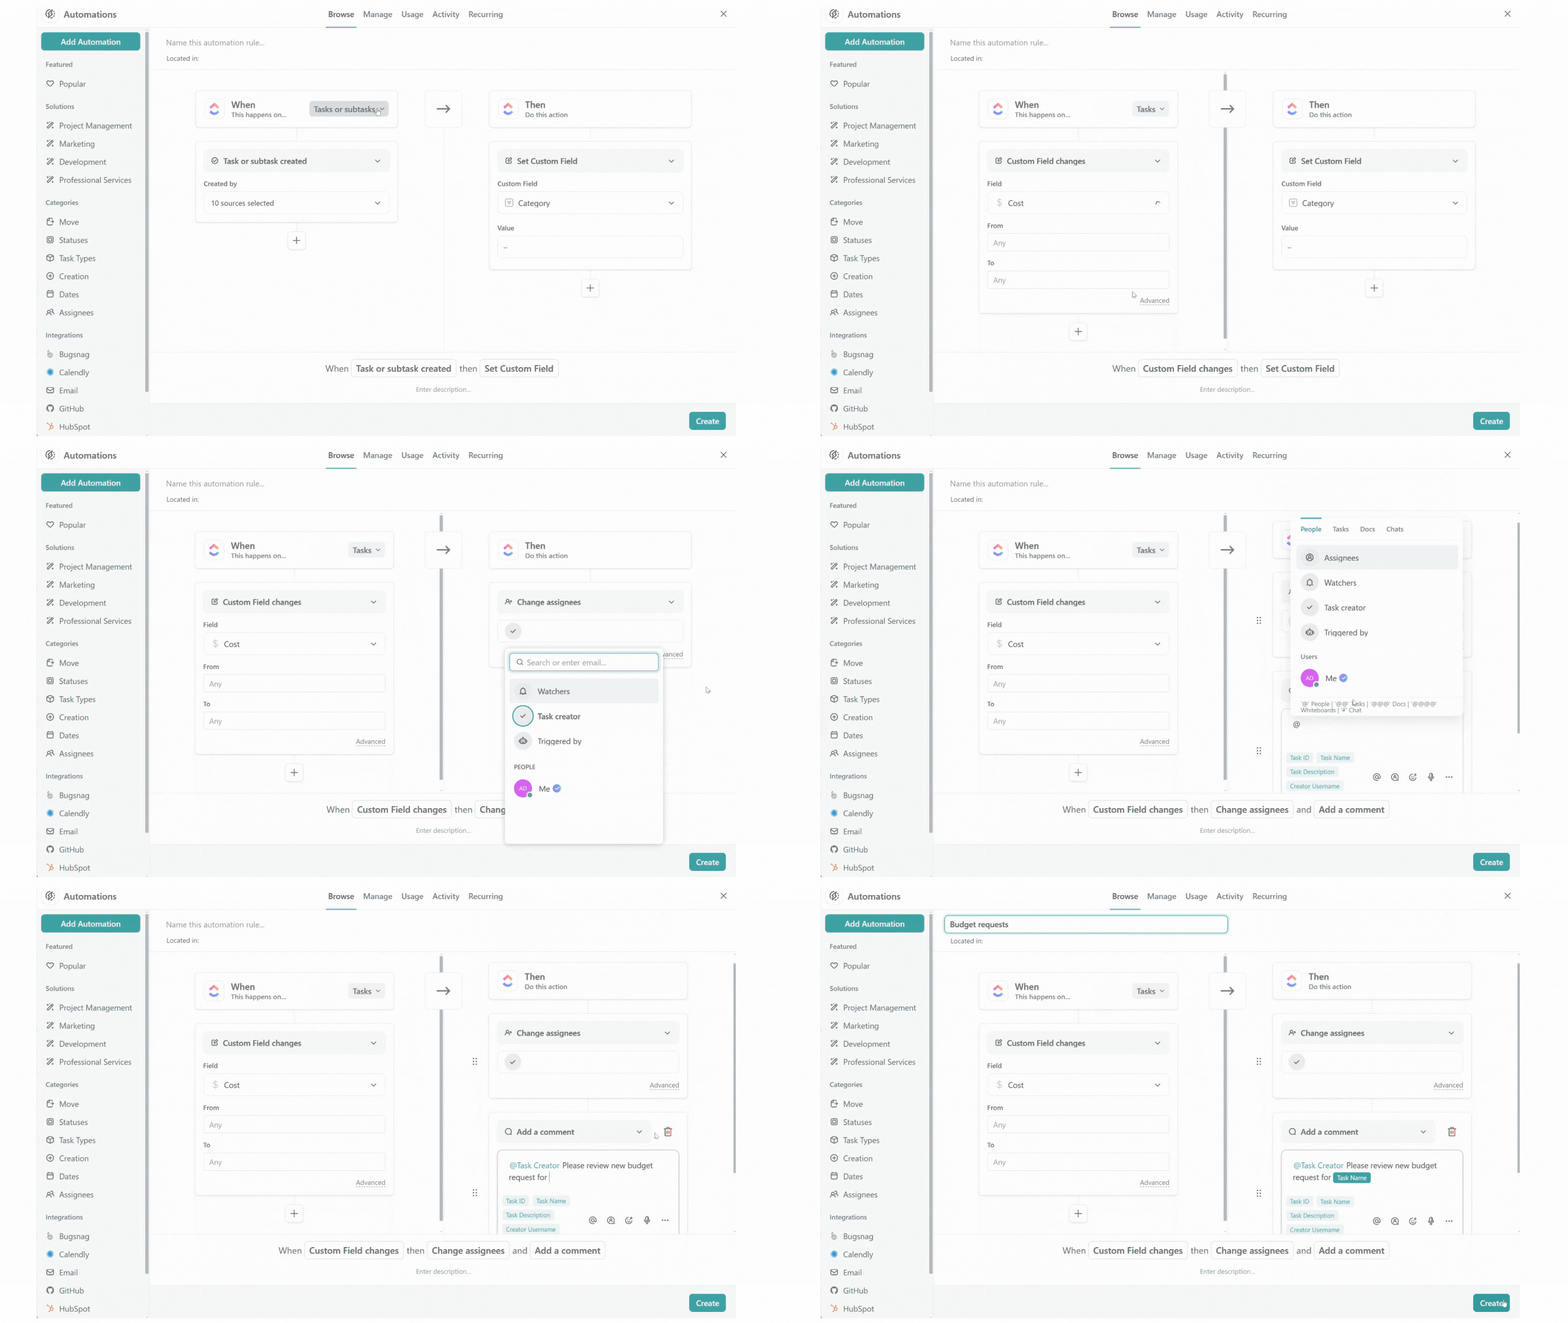
5. Custom field automations
Trigger actions based on updates to custom fields within your tasks.
- Go to Automations: In your list, folder, or space, click on the Automations tab.
- Choose a trigger: Click When this happens on… Tasks and/or Subtasks, select Custom field changes, then choose the specific field you want to monitor.
- Set the action: Add the action Change assignees or Add a comment based on the update in the custom field (e.g. if budget exceeds a certain threshold, notify the finance team).
- Finalise the automation: Name the automation at the top, then click the Create button. Now, actions will be triggered whenever the specified custom field is updated.

Best practices for using ClickUp Automations
While automations are incredibly powerful, it’s essential to set them up correctly to avoid chaos in your workspace. Here are a few tips for getting the most out of your automations:
- Start simple: Before diving into complex multi-step automations, start with simple ones. This will give you a better understanding of how automations work and prevent you from over-complicating your workflow.
- Review your automations regularly: As your team’s needs change, your automations might need to be updated or refined. Set aside time periodically to review them and ensure they’re still relevant and effective.
- Limit over-automating: While automations can save time, over-automating can lead to confusion. Too many automations running at once might disrupt workflows, so it’s essential to find a balance that enhances productivity without overwhelming your team.
- Document your automations: Keep a log of the automations you’ve set up. This ensures that team members understand how things are running behind the scenes, and it helps when you need to troubleshoot or make updates.
Additional pro tips for ClickUp Automations
- Use conditions: When creating more complex automations, you can set conditions. For instance, a reminder should only be sent if a task’s due date is coming up and it hasn’t progressed sufficiently through the workflow.
- Stack multiple actions: You can add more than one action per automation. For example, when a task status changes to Completed, you can update the task’s status and send a notification to the project manager at the same time.
- Cross-space automations: If your workspace is spread across multiple spaces, use automations that can trigger actions across them. For example, when a task is completed in one list, it can trigger a task creation in another.
Automations empower project managers to maintain project momentum, foster accountability, and deliver results more efficiently. By mastering these ClickUp automations, you’ll save countless hours of manual work and significantly enhance your team’s productivity.
So why wait? Start experimenting with ClickUp Automations today! (affiliate link*)
Free ClickUp marketing campaign plan
treamline your workflow and focus on what matters most. Get your free template and launch campaigns with confidence.
* We are participants in the ClickUp Affiliate Program, and we may earn a commission if you click on our affiliate link and sign up. All views are our own.
This post was previously published on Medium.com.

