Planner is Microsoft’s cloud-based project management solution, designed to simplify the process of planning, managing and tracking projects. Built on the Power Platform, it integrates seamlessly with Microsoft 365 applications such as Teams, further enhancing its utility and accessibility.
If you’re eager to learn Planner’s powerful and intuitive project management capabilities, read on for a 7-step guide on how to get started.
1. Navigate the homepage
The Planner homepage is where you’ll find all projects you have access to, including those you created and that others shared with you.
You can pin projects for easy access; simply locate them in the Plans list and click the pin icon next to the name. To remove a project from your favourites, click the pin icon again.

2. Discover the templates
Planner offers several project plan templates with predefined tasks and timelines catering to common project types. Designed to help you get started quickly, they help you apply best practices by following a structured approach, and reduce the risk of overlooking essential activities or milestones.
Templates include everything from simple task lists to complex project schedules:
- Research report
- Competitive analysis
- SWOT analysis
- Market study
- Software development
- Sprint planning
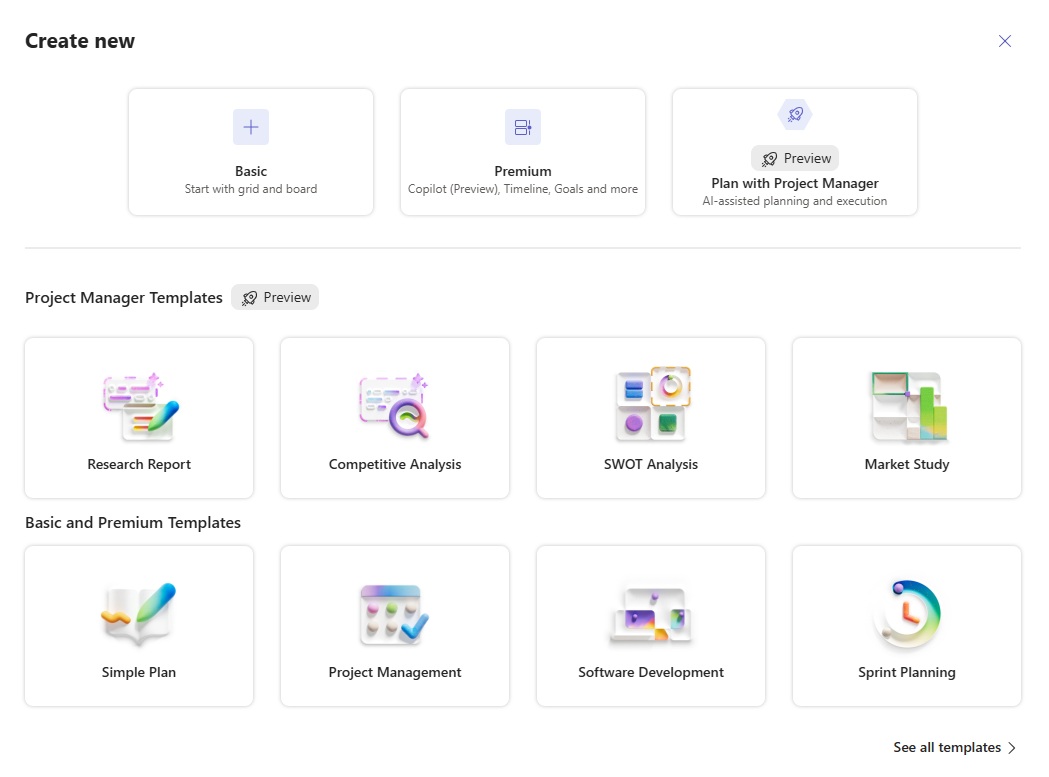
Tip: Customize out-of-the-box project plan templates to fit your specific needs by adding, removing or modifying tasks, deadlines, dependencies and fields.
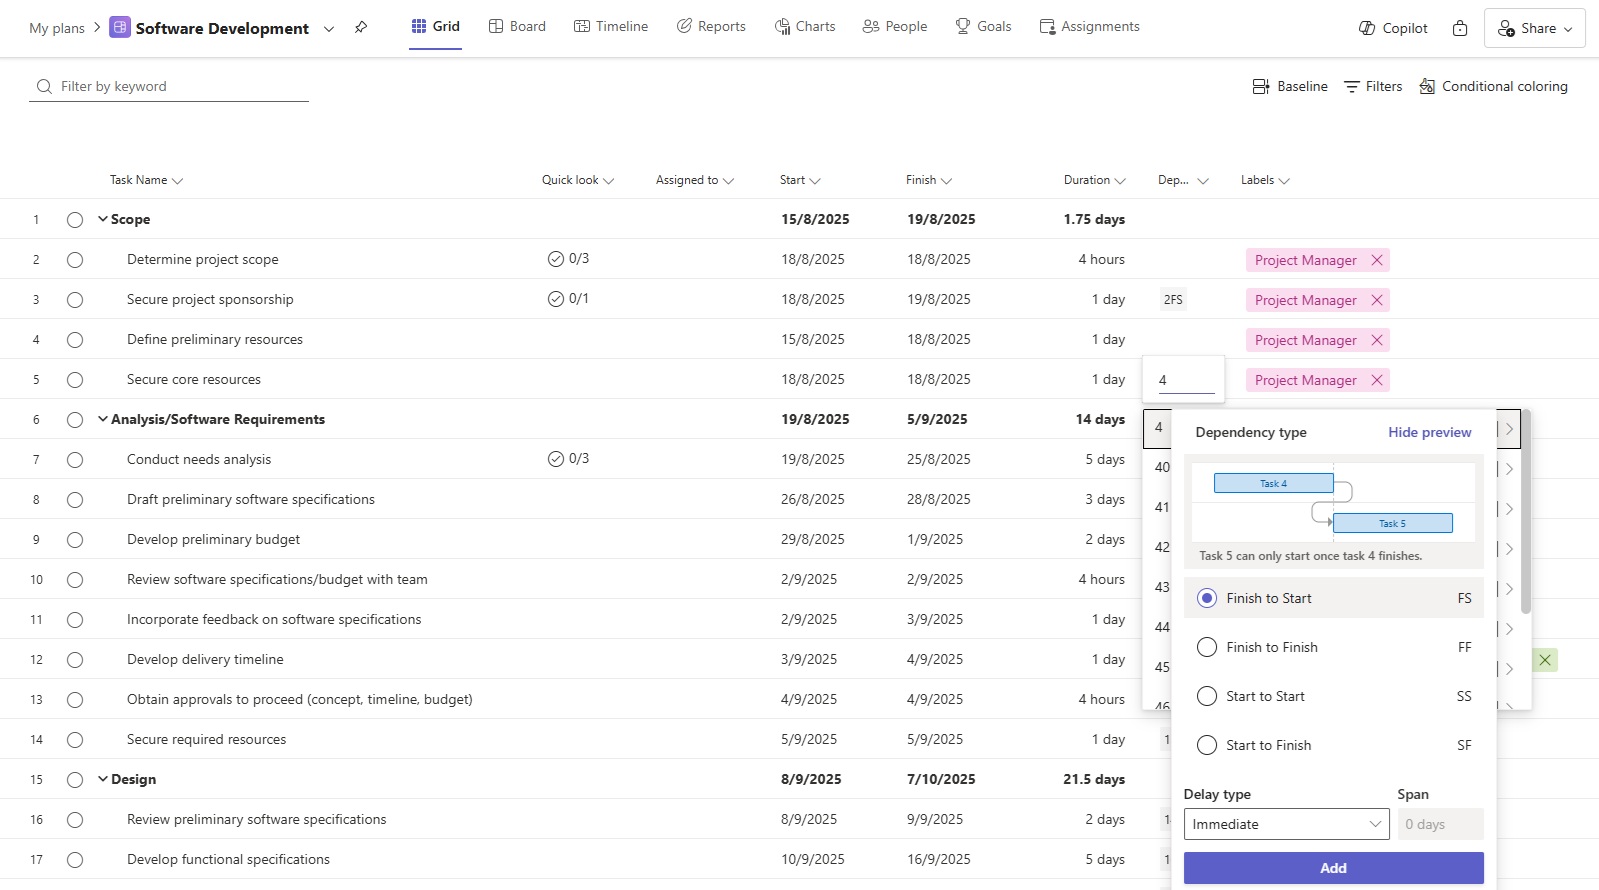
3. Create your first project plan
Setting up a new project is the first step to success. Whether you choose to use a template or not, you’ll begin by defining your project’s name, start date and end date.
Next, break down your project into manageable tasks and subtasks, utilising the task hierarchy to create a structured project plan.
Experiment with task dependencies to understand how they impact your project timeline. There are 4 types of dependencies:
- Finish-to-Start (FS): Task B starts only after task A finishes.
- Start-to-Start (SS): Task B starts at the same time or after Task A starts.
- Finish-to-Finish (FF): Task B finishes only after Task A finishes.
- Start-to-Finish (SF): Task B finishes only after Task A starts.
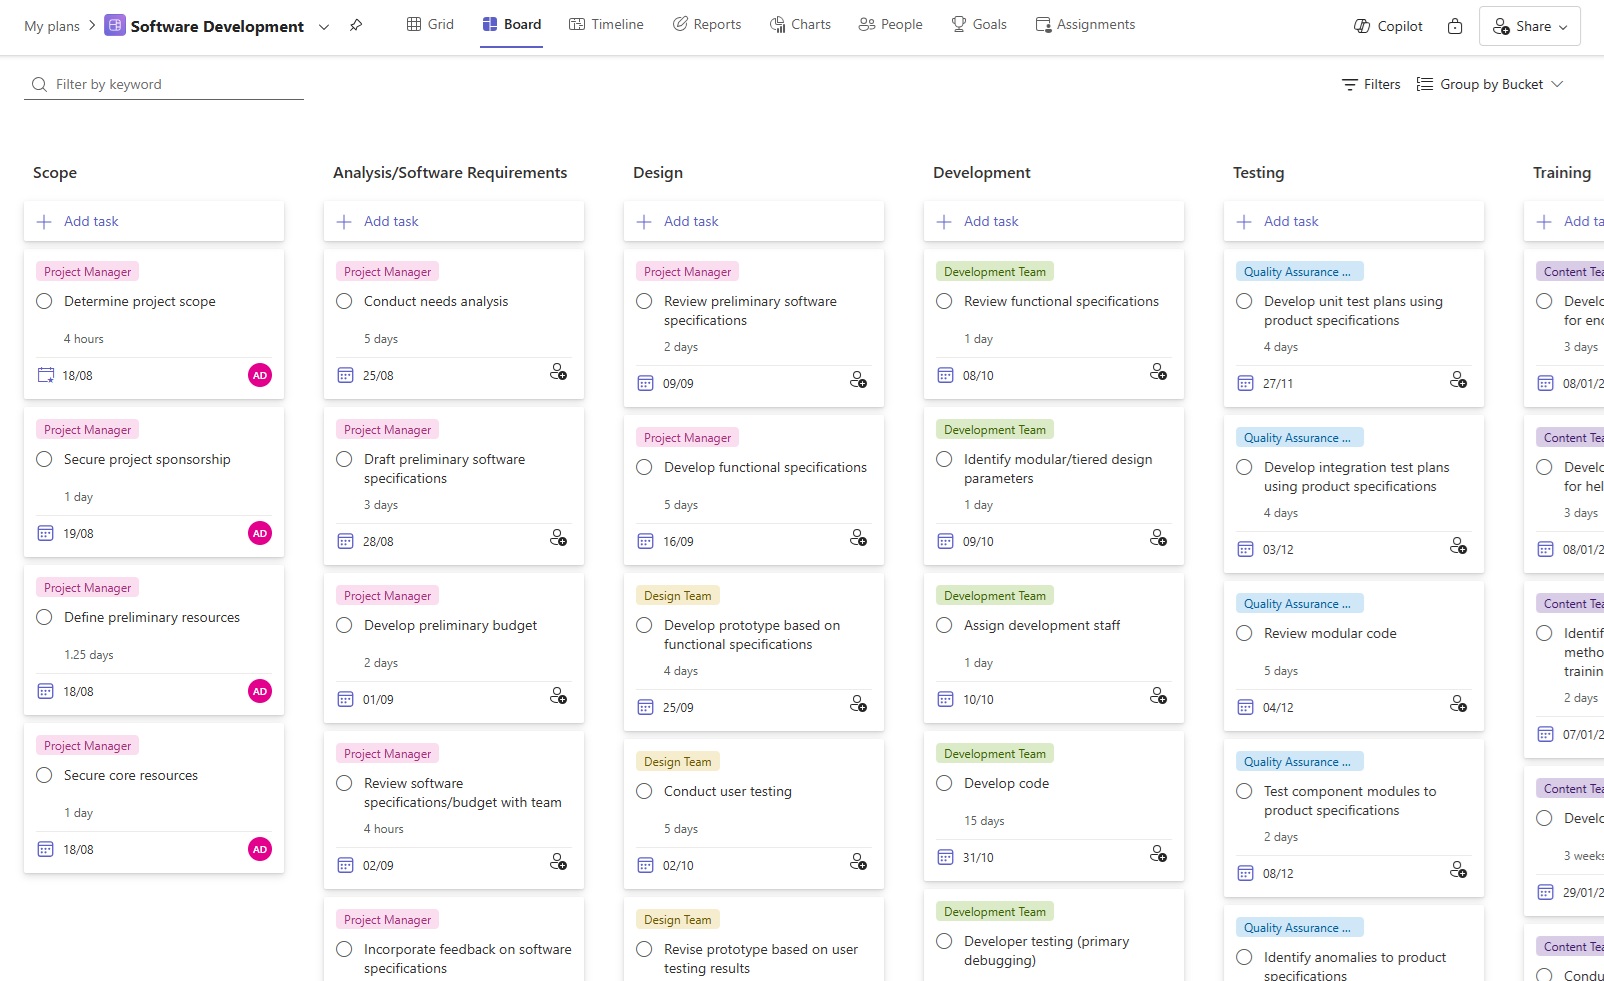
4. Explore the different views
To enhance flexibility and collaboration, Planner offers 3 main views to cater to different project management needs and styles:
- Grid: Traditional spreadsheet-like format that allows users to list tasks, assign resources, set durations, and track progress. It’s ideal for detailed data entry and viewing task information in a structured manner.
- Board: Presentation of tasks as cards in columns, making it easy to visualize and manage work in stages. It’s particularly useful for agile project management, allowing teams to move tasks through different phases and track workflows visually.
- Timeline: Gantt chart representation of tasks, showing their durations and dependencies. It’s perfect for scheduling and planning, providing a clear picture of the project timeline and helping to identify potential bottlenecks.
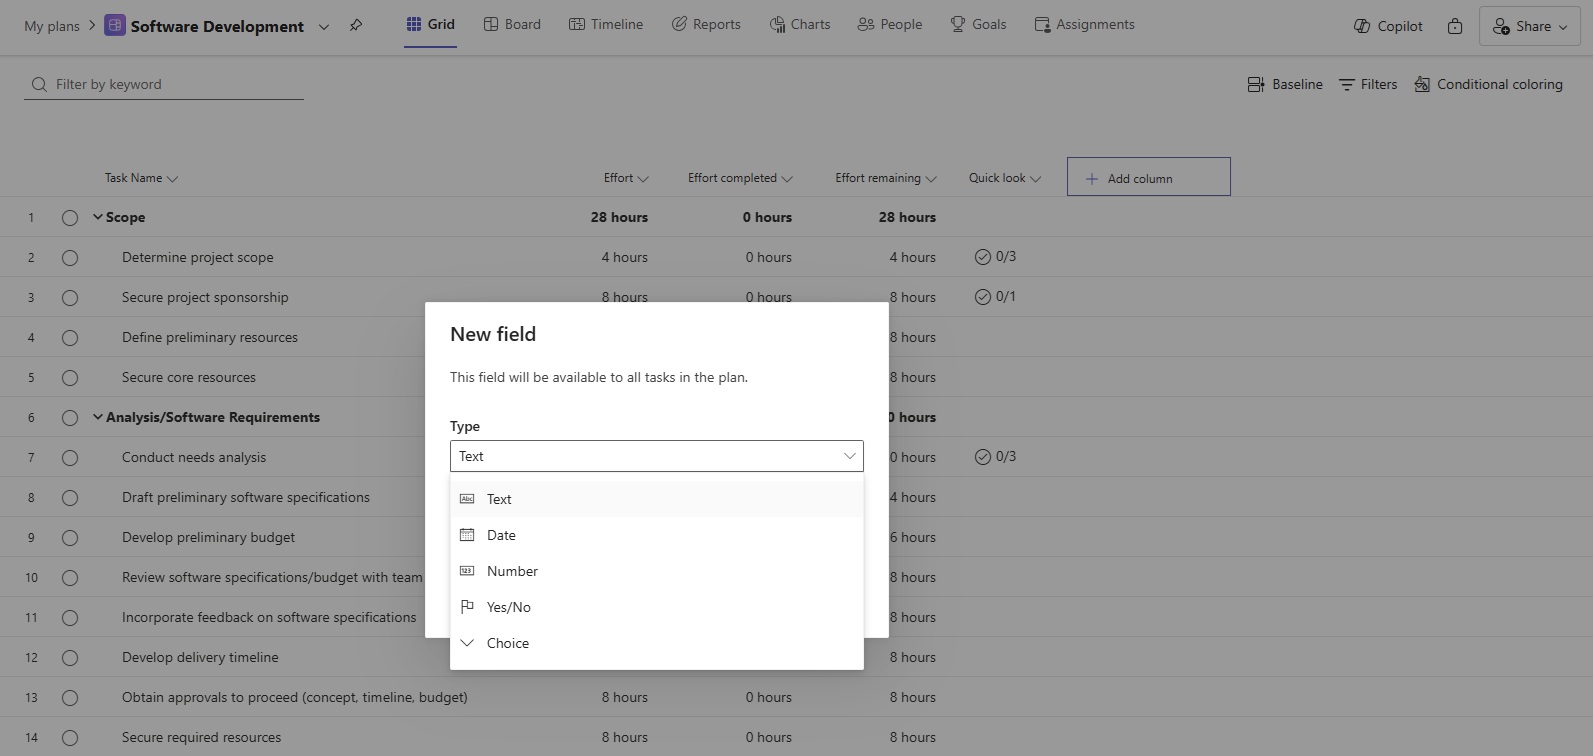
5. Customize fields and layouts
Planner provides a comprehensive set of columns to help manage and track project details effectively. Here’s a quick look at some key columns and their functions:
- Assigned to: Indicates the team member responsible for the task, facilitating clear accountability among project participants.
- Start/Finish: Specifies the task start and end dates, helping to schedule and sequence project activities accurately.
- Duration: Tracks the total time allocated for task completion, essential for planning and resource allocation.
- Bucket: Groups tasks into “buckets” for better organization and categorisation, making it easier to manage them by phases, sprints, or other criteria.
- % complete: Shows the progress of tasks as a percentage, providing a quick visual indicator of how much work has been completed.
- Priority: Helps you distinguish between tasks of varying importance and urgency, allowing teams to focus on high-priority items first.
- Depends on: Indicates the dependencies of a task, showing which tasks need to be worked on before the current task can start or finish.
- Dependents (after): Lists tasks that are dependent on the completion of the current task, helping to understand the impact of delays or changes.
- Effort: Tracks the estimated amount of work required to complete a task, usually measured in hours or days.
- Effort completed: Shows the amount of effort already spent on a task, aiding in tracking progress.
- Effort remaining: Calculates the work still needed to complete a task, which helps with resource planning and time management.
- Labels: Customizable tags that can be used to categorise and filter tasks for improved organization and searchability.
In addition to these out-of-the-box columns, Planner also allows you to create custom fields tailored to specific organizational needs. Here are the different types available:
- Text: Allows for the input of alphanumeric characters and can be used for various types of project data, such as descriptions, notes or comments.
- Date: Enables the selection of specific dates or date ranges, critical for scheduling milestones or project phases.
- Number: Used for numeric data, such as quantities, durations, or monetary values.
- Flag (Yes/No): Checkboxes that indicate true or false values, useful for tracking custom statuses or project phases.
- Choice: Offers predefined options in a dropdown menu, ensuring consistency and standardization in data entry.
Tip: All columns can be reordered to suit your workflow or hidden to focus on essential project details without unnecessary distractions.
6. Track progress
Tracking the status and progress of a project plan is crucial for ensuring timely completion, efficient resource management, and overall project success.
By regularly monitoring milestones and deadlines, you can identify potential risks and issues early, and take corrective actions to stay on schedule. Planner offers several features that allow you to do this effectively.
- Update task status: Move tasks between Not started, In progress and Completed columns in the Board view or manually specify the progress percentage of each task in the % complete column via the Grid view.
- Adjust timelines: Update start and finish dates in the Timeline view to accurately reflect progress.
- Monitor task completion: Mark tasks as complete once they’re finished by setting the % complete to 100% in the Grid view or by moving the task to the Complete column in the Board view.
- Check progress indicators: Use built-in indicators to assess project health. Planner alerts you to upcoming tasks by using a yellow background and to late tasks by highlighting them in red.
- Use reports: Visualize progress and identify bottlenecks by analysing the status of tasks and effort per team member via the Charts view. Check the task History for further details on progress.
Tip: Connect Planner with Power BI to visually explore and monitor progress across a programme or portfolio.
7. Collaborate with your team
Planner offers built-in collaboration tools to share your project with team members and stakeholders and track progress.
- Assign tasks and responsibilities: Clearly assign tasks to team members and ensure they understand their responsibilities. Contributors can filter task lists in the Grid, Board and Timeline views to identify the ones they’re assigned to. Additionally, they can filter by the Finish date to determine what they need to focus on next.
- Communicate via Teams: Leverage collaboration features by adding the project plan to a Teams channel where you can have in-depth conversations about specific tasks.
- Schedule regular check-ins: Recurring meetings to review progress, address issues, and adjust plans allow you to ensure the project is on track and that team members are aligned.
Microsoft Planner can be a powerful tool for managing projects if you take the time to learn its features and use them effectively. Follow the guide above to get started and make the most of the platform.
This post was previously published on Medium.com.